
We made an adjustable climbing wall that we call “The Driftless Board.” Our Driftless Board is kept outdoors, and because we wanted it to last, we used green-treated lumber (¾ inch plywood and 2 X 6 framing). Our treated lumber was very wet when we erected our 8 X 12 foot wall and it was almost unliftable, even with 3 sort-of strong dudes. Our goal was to make the board easily adjustable for a single person and we quickly realized that we were going to need a system that offered a mechanical advantage to the user. Had this been an indoor wall we may have considered purchasing a mechanical wench to make angle adjustments. However, because our board was unprotected from the elements and in a rather remote and peaceful setting, we decided to use a pulley system instead.
If you are new to pulley systems or block and tackle systems take a minute to watch this short video:
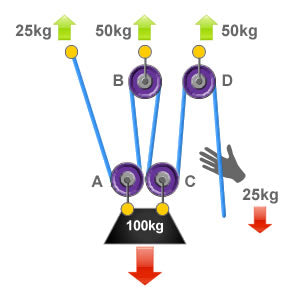
In a nutshell, a pulley system is used to draw a load (climbing board) to an anchor (a tree). Adding additional pulleys increases the mechanical advantage in lifting the load. We used a 4:1 system which simply means that there are 4 lines that support the load. With this system, every pound of force that is applied results in 4 pounds of force lifting the wall. So, if it takes 200lbs of force to lift the wall the user only need produce 50 pounds of force to accomplish this in a 4 to 1 system.
Like most climbers, we have tons of old ropes. So, we made use of an old 10mm static line to rig the pulley system. We bought the pulleys from the local hardware store and used quick links, carabiners and eye bolts to rig the thing together. The pulley's cost about $8.00 apiece and have a 650lb capacity. When writing this up I found this kit with double pulleys for $100 that I would have purchased had I known about it. This system would have looked a little nicer and the pulleys are rated to 7100lbs.
Anchoring
Lucky for us we had a good strong tree behind the climbing board that we utilized for an anchor. Although we could have slung the tree with webbing, we were convinced by an arborist friend that it would be safer for the tree, and the system, if we through bolted the tree with and eye-bolt and anchored to that. So, we drilled 12 feet above the ground, using an auger bit, completely through the diameter of the 21 inch tree and then pounded a ¾ inch galvanized steel rod through the hole. We capped the rod with a large washer and nut on the non-load side and a washer and eye-bolt on the load side.
IMPORTANT: Do not use an eye screw when anchoring to a tree! That same arborist friend informed us that a living tree will encapsulate a screw and over time a screw may pull right out!
If you don't have a tree, make one!
If you are constructing an outdoor board but don't have a sturdy tree to anchor on, you may consider erecting a sturdy upright. If you want a tree like anchor buy a 16 foot treated 6 X 6 inch timber. Dig a hole four feet deep and use a 12 inch diameter concrete forming tube to set your timber and fill with cement. This puts the top of the 6X 6, 12 feet above the ground and you can anchor the pulley system and board a few inches from the top.

Adjustable system on a pole
Guide lines: If you are not completely confident in your tree or upright beam, or you just want to be uber safe, you may consider adding a couple of guide lines behind the anchor for backup. Pick up a couple of earth screws and use either static webbing or cable to attach your ground screws to the top of your upright anchor or tree.
Finally, we used two eye-bolts to attach the pulley system to the upper 2X6. To anchor the rope end with use an old Gri-gri and an eye-bolt.
Important: We only use the rope and pulley system to make adjustments to the angle of the board and as back-up support. We use two pivoting 4X4 boards that serve as legs for the main support.
If you have any questions about construction or have anything to add, please leave them in the comments. Check back for more posts on the other construction steps for the Driftless Board.